***
Condensed milk is wonderful. I don't see how they can get a cow to sit down on those little cans.
- Fred Allen
***
Caramel Squares a.k.a Millionaire Squares. This sweet and caramel-y tray bake is a popular one here in Northern Ireland and across the UK. It's comprises of a shortbread base, caramel filling and chocolate topping! YUM!
I was first introduced to this delicacy when my boyfriend insisted I try it whilst visiting a local bakery. I had never heard of a caramel square. In Canada we have butter tarts that have the same gooey/caramel like texture but nothing that really came in square form a.k.a tray bakes. That's another thing I learned here: tray bakes. Back home we simply call them squares or bars, but here, if you see a selection of squares and bars they are referred to as 'tray bakes' Essentially, a tray bake is exactly what it sounds like. It's a 'cake' that is baked in a tray, usually cooled as well and then cut into squares, which you'll notice in this recipe. I'd say the Canadian equivalent to a caramel square would be the nanaimo bar. They don't taste the same, but if there's one really popular tray bake in Canada it's the nanaimo bar (though you don't bake it....bah! you get what I mean right?).
Anywho, I decided today I would attempt baking up some caramel squares for the second time (the first time was 'okay' but I may have burnt the caramel, and thus steered clear of making them again). This time however, I learned my lesson and would like to share this delicious treat with all of you! Now keep in mind, this is only one version of making caramel squares. If you google recipes, you'll notice there are tons of variations. I mean tons. The one I'm sharing with you a simple recipe that uses few ingredients. It's just like what you find in cafes here!
Now, it's a rainy day today, so it really set the "baking" atmosphere in my home. Perhaps you'd like to try this on a rainy day as well, perhaps play some Jason Collet in the background? That's what I did, and my squares turned out perfectly!
----
You will need:
THE SHORTBREAD BASE
225 g plain flour (all purpose flour)
85g caster sugar (granulated works fine as well)
200 g butter
THE CARAMEL MIDDLE
115 g butter
397g/1 tin Condensed Milk [sweetened or unsweetened] - I used the 'light' version
3 tbsp Golden Syrup (if it's hard to find in N.American, corn syrup should work!)
100 g brown sugar or regular sugar(I like the taste and colour that brown sugar adds)
THE TOPPING
200g good quality chocolate. Milk or dark, whichever you prefer
EQUIPMENT
Scale, Bowl, 9x9 inch baking tin, whisk, med saucepan, heat proof bowl
---
Place butter, sugar and flour in a bowl. I don't have a food processor, so I did this by hand, but you can blitz them in a processor if you'd like! I rubbed the butter and flour together to get a breadcrumb like consistency. You don't want to really blend it all together because you don't want to cream the butter or melt it. So just gently rub. You could use the two knives technique as well which is use when making a short crust pastry
---
Bring the dough together. I made a ball of dough here to show you what it should resemble. Though, you're going to press this dough into your prepared tin anyway, so you'll put it all together in the tin! So... press the dough into your tin! Make it as even as possible!
Prick the dough with a fork. Place tin in the oven at around 170*C for 20-25 mins. Just keep an eye on it, you want it to be a nice golden brown colour, don't burn it!
It should look like this! Let it cool, and start making the caramel!
---
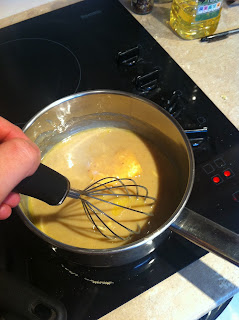
Combine the butter, sugar, syrup and condensed milk into a saucepan and stir over low-med heat until butter is fully melted. Make sure to whisk!
Now, here's the part I failed at before! DO NOT WALK AWAY FROM YOUR CARAMEL IT WILL BURN!!! You want to raise the heat now. You'll want it to bubble a bit... but don't wait to see the bubbles like I did. The bottom will start burning even before the bubbles, so just make sure to whisk constantly. Even this time I waited about 3 seconds without stirring and it already started to burn, but thankfully I was able to save it by whisking. So just keep on going, it'll take about 5-8 minutes. I promise, it will start to thicken and look like caramel!
It'll look something like this!
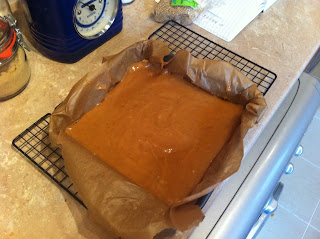
Evenly pour the caramel over your cool crust!
---
In a double boiler, or in a heat proof bowl over boiling water, melt your chocolate. I ran out of the majority of my dark and plain chocolate, but I still had some while chocolate, so I put that into the mix!
Once it's melted, pour over your caramel! And let it cool again! You may want to refrigerate them over night. It will allow the flavours mix together and the crust etc, to harden properly. But if you're like me... you'll unwrap them after an hour and take bite...Make sure to keep these guys refrigerated for up to 5 days or so. But perhaps you'll want to freeze them! I'd say they'd be okay in the freezer for 3 months or so...
Now the moment of truth....
Take the caramel square out of the tin, unwrap it from the paper and cut your squares!
I read in one recipe to cut your squares before the chocolate hardens... but If you're careful, the chocolate shouldn't really break to much, should be fine. Now my crust is a bit flakey.. perhaps I should have pressed it more, or maybe some more time in the fridge will really help harden it! Either way it's lovely!
Remember, this is just my version. You can play with the ingredients and flavours! It's really easy to make, it's basically fool proof, as long as you make sure to constantly whisk your caramel!
Enjoy your square with friends, family and a nice cup of tea.
Keep Smilin'
- Mon


That... looks delicious. I can't bake, but this sure tempts me to try.
ReplyDeleteThey are easy! You're a sauce man aren't ya?!? This should be okay for you! I think I know a girl who might like if you made them...
ReplyDelete